
Monday, February 11, 2013
Running in Circles
A quick observation on cutting circles. After you cut the circle with the tool or method of your choice, and you put in your relief cuts.... tap between the relief cuts. Half the time when I start tapping on a relief cut, I get a piece bisected in two. That does make the rest of the run easier, heh...
 Arrows pointing at the successful score, unlike its twin on the bench, bisected. Red dot where I started tapping. Fortunately this is a fusing test.
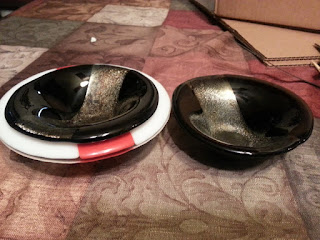
Friday, February 8, 2013
Same bowls, different
A friend requested some bowls in her household colors, black and gold. With only a week before Val Day I went looking on Delphi's website (they are nearby and ship fast) and found a 3mm black and a 2mm black w/ iridescent gold:
 (Unfortunately I think it looks better in photos than reality)
Glass used (Product ID's provided by Delphi, may be proprietary):
B010130 Bullseye Stiff Black 90 COE
B010058 Bullseye Black Opal Gold Iridized Thin
B110038 Bullseye Tekta Clear 3mm - 90 COE
I'm not precisely sure why the gold-on-black is a millimeter thinner, something to investigate later (UPDATE: It's intended for jewelry making, and not general fusing). The blanks are in the kiln fusing at the moment:


Regardless, I tried slumping it. The results were.... ugly. The bowl was misshapen, cracked, and uneven. It had over-slumped, as well, and almost pooled in the bottom of the mold:

I didn't know if this was some result of the cracking or not, so I tried the second blank I prepared. It was not quite as ugly, but still misshapen. Here they are with comparison to a well-formed Midrealm bowl:
After staring at a bowl for a long time, I believe this is because of the 2mm gold glass. I suspect it got hotter faster, being thinner, and started to slump prematurely. I slumped another midrealm bowl afterwards just for comparison and it came out fine, with the mold in the exact same place, so I don't believe its a kiln issue. Of course, now I found Delphi has the same glass in 3mm, so there is only one way to find out...

Glass used (Product ID's provided by Delphi, may be proprietary):
B010130 Bullseye Stiff Black 90 COE
B010058 Bullseye Black Opal Gold Iridized Thin
B110038 Bullseye Tekta Clear 3mm - 90 COE
I'm not precisely sure why the gold-on-black is a millimeter thinner, something to investigate later (UPDATE: It's intended for jewelry making, and not general fusing). The blanks are in the kiln fusing at the moment:


I will say, they do look pretty! Unfortunately it ended in complete failure. The blanks looked very pretty, the gold really comes out after fusing, as shown below. I don't normally crash cool, and as such it can take a lot of hours for a blank to cool down. Because I wanted to slump this right away, once the blank was 250-300° or so, I took it out and put it under hot water, which I then slowly changed to cool water, bringing it to room temperature in about a minute. I've done this several times with success. This time, however, I think the plate was hotter than the temperature on the kiln let on; as soon as it hit the hot water a significant crack appeared, between the color and clear layers:


Regardless, I tried slumping it. The results were.... ugly. The bowl was misshapen, cracked, and uneven. It had over-slumped, as well, and almost pooled in the bottom of the mold:

I didn't know if this was some result of the cracking or not, so I tried the second blank I prepared. It was not quite as ugly, but still misshapen. Here they are with comparison to a well-formed Midrealm bowl:

After staring at a bowl for a long time, I believe this is because of the 2mm gold glass. I suspect it got hotter faster, being thinner, and started to slump prematurely. I slumped another midrealm bowl afterwards just for comparison and it came out fine, with the mold in the exact same place, so I don't believe its a kiln issue. Of course, now I found Delphi has the same glass in 3mm, so there is only one way to find out...
Saturday, February 2, 2013
Ornament Class Docs (2012)
Below is the documentation I used for an ornaments class at St. Nick's Tourney/Toys for Tots, in the Barony of the White Waters late 2012. The safety section, most of the first page, is intentionally dark. It is based off of the safety section from How to Work in Stained Glass by Anita and Seymour Isenberg, which made me laugh for hours (and, as a result, I've never forgotten the rules). I've taught the class three times, but only decided to write docs for the third time, since it was at a significant event. I was a little nervous when HRM AnneMarie took a copy of the docs, and I had to quickly explain. Fortunately she said she likes dark humor.
I reference a story in the docs, about the first ornament I made. I originally learned this technique at Chicago Hot Glass during a 2-hour mini-class. When you blow the bulbs too hard it gets so thin it has the consistency of saran wrap.... very thin, sharp, and hot. That glass breaks into dust and flies away easily. I learned this first hand when I made this mistake, aimed at my neighbor's face.... fortunately no one was hurt!
PDF available upon request.
------------------------------------
Glass Ornament Blowing
Safety!
Closed-toed shoes required! If
you are wearing anything less and there is an accident, how will you
count to 20 for the rest of your life?
Don't chase glass! Try and
imagine a beautiful glass ornament you've worked hard on for 20
minutes. Imagine it slipping out of your grip and tumbling through
the air, glittering as it goes. Imagine it shattering on the floor.
Imagine getting over it! It doesn't matter how good your
medical insurance is, a trip to the ER for stitches and burns is not
worth a few dollars in glass and fuel! This is a cardinal rule of
glasswork of any kind! Besides, you'll have more fun making it again
after we sweep up the shards.
Party like it's 1099°... Glass
doesn't begin to glow until around 1100 °F (or hotter!). Unless you
are very sure how long a piece of glass has been cooling, assume it
is 1000° (and remember skin sublimates at 800°). Use tools
and gloves to handle dubious glass.
Lead Poisoning is very period,
but let's overlook that at the torch. If you are working with glass
powder or very fine frit, inhaling it could lead to lead poisoning
(death), silicosis (death), and wasting glass (worse
than death). Use these substances in a well ventilated area, ideally
a fume hood! This should not be a problem while making ornaments, but
its worth mentioning anyway!
Eye surgery is $5,000. A Braille
machine is $2,000. A pair of quality lampworking goggles is $40. A
pair of capable sunglasses is $10. While looking at a torch for an
extended period, even while just observing, you need to protect your
eyes. Eye protection is provided. If available please use the
Didymium/ACE 202 glasses (Big, purple lenses). If they are being
used, please grab a pair of sunglasses, they are better than nothing
and will catch your neighbor's mistakes! If nothing else, for the
short time we are working, not wearing glasses shouldn't cause any
permanent harm. Ask
Brynn about the first time he made an ornament...
History
The history of glass ornaments is
almost as brief as this paragraph, relatively speaking. Unfortunately
ornaments are NOT period, but they are a fairly safe introduction to
lampworking, which is. The first glass Christmas ornaments were made
in the area around Lauscha, Germany in the mid-1800s.
The first ornaments were made to
resemble fruit, nuts, and other natural items that families were
using for 50 years to decorate their trees. The ornament makes
discovered a huge market for their wares and in the 1880s and 1890s
W.F. Woolworth began importing glass ornaments. He was selling $25
million worth every year. (Source:
http://www.ornamentshop.com/history_story/part2.asp)

1
– MAPP Gas Tank (MAPP-type gasses burn around 5,301°F, compared to
Propane which, at best, reaches 3,623°F)
2
– Hot Head torch (This is a cheap entry-level torch. Contrary to
what some will say, it can do almost everything dual-gas torches do
for beadmaking)
3
– Didymium Glasses (The best choice for “soft glass” work. For
a short period of time they aren't needed but recommended!)
4
– Flint Striker (The lighter of choice for torches)
5
– Sample Ornaments (The finished product. It can be 1 color or
many, melted in (like the green) or grainy (like the other two))
6
– COE 90 Rods (For “wrapping” around the outside, of you
choose.)
7
– COE 90 Dichroic strips (Also for wrapping. Dichro-side down!)
8
– Speedy Sharp Carbide Cutter (Made for sharpening knives, it works
well at cutting glass tubing)
9
– COE 90 Frit (The color to our ornament!)
10
– Glass ornament bulb/glaskolben (A pulled glass “point” we
will fill with frit and melt and blow)
11
– Ornament cap/hook (to hang your ornament with!)
Challenges of Boxmaking, pt. 1
I love the idea of stained glass boxes. I have seen so many beautiful ones made, and I've made four to date. Only one actually survived as a finished piece, unfortunately. The first was made when I didn't have the right tools on hand and while trying to move into a new home. That was a disaster and I was embarrassed to give it to the commissioner. The second turned out better, but the hinges were weak and ended up tearing off in transit. Again, unfortunately, I didn't think there was much choice. Both of those were made with tube hinges, as detailed in How to Work in Stained Glass by Anita and Seymour Isenberg. Essentially you use a piece of wire that fits tightly in a piece of tube; You score the tube into three pieces, solder two to the lid and one to the base (or vice versa). This is a bit cleaner than the old L-shaped elbow hinges most people make. Unfortunately, for me at least, they are very hard to get right. I started with these because HtWiSG has been my glass bible from the very beginning;
My third attempted worked:
 This was made for my brother to store a deck of tarot cards, something he collects. I used a tube hinge and it worked fine.
While browsing a supplier's website, I saw they sold hinges for glass boxes that appeared like regular hinges. I got the idea to try this out, and bought hinges at a local hardware store and ground them down.

Unfortunately, these are not much easier to place.
My first "pale" project I thought of was the same box pictured above. I made the base and sides and got sidetracked. Recently for a holiday party I tried to complete it in a hurry. I finished the lid, got the hinges ready, and managed to build a solder bridge between them. I ended up tearing the hinges out and not having anything for the white elephant exchange.
This set of instructions made me realize my first mistake may be in not tinning the contact parts up front. I think for my next attempt (which will be to finish this pale box) I'm going to try the traditional L-shaped elbow hinge and see how it works for me. Then I can finally finish this box up and free up the bench space. Right now it is an ugly mess, after having to rip it apart.

My third attempted worked:

While browsing a supplier's website, I saw they sold hinges for glass boxes that appeared like regular hinges. I got the idea to try this out, and bought hinges at a local hardware store and ground them down.

Unfortunately, these are not much easier to place.
My first "pale" project I thought of was the same box pictured above. I made the base and sides and got sidetracked. Recently for a holiday party I tried to complete it in a hurry. I finished the lid, got the hinges ready, and managed to build a solder bridge between them. I ended up tearing the hinges out and not having anything for the white elephant exchange.
This set of instructions made me realize my first mistake may be in not tinning the contact parts up front. I think for my next attempt (which will be to finish this pale box) I'm going to try the traditional L-shaped elbow hinge and see how it works for me. Then I can finally finish this box up and free up the bench space. Right now it is an ugly mess, after having to rip it apart.

Cross Pattee Commission
This was commissioned by my SIL's co-worker, a history buff and fan of the Knights Templar.
 It's made with red waterglass from Spectrum. The white is some kind of evil mutant glass that still haunts my bench; I'm considering pitching it all instead of throwing good time after bad money.
The white glass appears to be almost a clear/white mix. There is an odd texture that makes me believe it, and it has been notoriously difficult to cut. Many glasses that are supposed to be a pain (Youghiogheny comes to mind) work fine for me. This one mis-broke every time. It is of unknown manufacturer, as I bought it from a local shop and didn't note the ID number which has long since worn off.
I had to repair multiple pieces while it was still being made. At one point I was soldering outside and it managed to slide off my little portable table, breaking pieces. Thermal shock while soldering broke another, something I've never had happen before or since. I'm rather relieved to have gotten it this far.
Viewing it completed, I think I'd prefer it with a border, even if it's just zinc came. A wooden border would also be nice, but I think both are ruled out because the thinness of the border.
Project Technical Notes: Crown Tourney Assignment
We have won a bid to host the Kingdom A&S competition and Crown Tourney in May. During a feast prep inventory we discovered we need some small bowls and plates. In an effort to jazz it up a little for the eight seats at Head Table, I volunteered to make eight bowls and eight plates featuring the Midrealm pale. These are going to be promptly washed and given back to HT to keep.
Materials:
6" Blank (Bowls):
3"x7" strip of white (x2) (I'm using an unspecified white Bullseye fusible glass, 3mm)
1.5"x7" strip of red (x1) (I'm using an unspecified red Bullseye fusible glass, 3mm)
7" square of clear (x1) (I'm using Bullseye Tekta clear, 3mm, double rolled)
6.5" Blank (Plates):
2.75"x7" strip of white (x2)
2"x7" strip of red (x1)
7.25" square of clear (x1)
The red and white glasses are unspecified because I bought them from my favorite storefront, and the information was not listed or recorded (and the glass quickly cut up before the number on it was noted). The clear was purchased online from Delphi, making the details better known.
Original concept art (plate):

Making the bowls
Cut with a circle cutter so that the blank ideally has proportions of 2.25", 1.5", 2.25" so that the pale (red stripe) is not quite on even footing with the white field (in heraldic terms), although that is not required. This is a common presentation, even if not strictly correct.
My starting position:


I slump it using a mold from Slumpy's, using the standard "small piece" slumping schedule pre-programmed in my kiln:
300°F/hour to 1000°F, hold 0 minutes
500°F/hour to 1280°F, hold 20 minutes
FULL/hour to 950°F, hold 30 minutes

Making Plates
The process is much the same as above, but the sizes of the strips are different. After cutting with the circle cutter the desired end proportions are 2.5" white, 2" red, 2.5" white (for a 7" pattern). I discovered that I mis-remembered my past measurement and my plate mold is actually 6.5" in diameter. A quick check during a holding cycle showed that the extra .25" rim didn't droop like I feared, but slumped successfully. I'm not sure if I will stick to these numbers or go ahead and make a 6.5" blank next time, but I suspect the latter, though the end result was fine.
Same fusing and slumping schedules used as for the bowls.


The completed set:

Materials:
6" Blank (Bowls):
3"x7" strip of white (x2) (I'm using an unspecified white Bullseye fusible glass, 3mm)
1.5"x7" strip of red (x1) (I'm using an unspecified red Bullseye fusible glass, 3mm)
7" square of clear (x1) (I'm using Bullseye Tekta clear, 3mm, double rolled)
6.5" Blank (Plates):
2.75"x7" strip of white (x2)
2"x7" strip of red (x1)
7.25" square of clear (x1)
The red and white glasses are unspecified because I bought them from my favorite storefront, and the information was not listed or recorded (and the glass quickly cut up before the number on it was noted). The clear was purchased online from Delphi, making the details better known.
Original concept art (plate):

Making the bowls
Cut with a circle cutter so that the blank ideally has proportions of 2.25", 1.5", 2.25" so that the pale (red stripe) is not quite on even footing with the white field (in heraldic terms), although that is not required. This is a common presentation, even if not strictly correct.
My starting position:

I use duct tape to bind the three strips together tightly, flip them over, place them into my circle cutter, and if the glass gods are kind, I end up with a circle. Remove the three pieces from the duct tape. The cuts on the red strip are so subtle I pop them easily with my running pliers. The cuts on the white stripes are much more substantial; I make perpendicular relief cuts like I would would with a solid circle and tap them out with the back end of my glass cutter. This seems to be more reliable than the idea of slowly applying pressure on either end of the cut with running pliers.
I cut a clear base using normal circle-cutting techniques. Assemble:

I use the standard "small piece" fusing schedule my kiln came preprogrammed with:
300°F/hour to 1000°F, hold 0 minutes
FULL/hour to 1350°F, hold 0 minutes
500°F/hour to 1425°F, hold 10 minutes
FULL/hour to 950°F, hold 30 minutes
The fused "blank":

I slump it using a mold from Slumpy's, using the standard "small piece" slumping schedule pre-programmed in my kiln:
300°F/hour to 1000°F, hold 0 minutes
500°F/hour to 1280°F, hold 20 minutes
FULL/hour to 950°F, hold 30 minutes
The finished bowl:

Repeat seven more times....
Making Plates
The process is much the same as above, but the sizes of the strips are different. After cutting with the circle cutter the desired end proportions are 2.5" white, 2" red, 2.5" white (for a 7" pattern). I discovered that I mis-remembered my past measurement and my plate mold is actually 6.5" in diameter. A quick check during a holding cycle showed that the extra .25" rim didn't droop like I feared, but slumped successfully. I'm not sure if I will stick to these numbers or go ahead and make a 6.5" blank next time, but I suspect the latter, though the end result was fine.
Same fusing and slumping schedules used as for the bowls.


The completed set:

Not all it's cracked up to be...
An interesting result from yesterday's firing; while cutting the circle for the blank, one white strip bisected accidentally. I didn't worry about it, since I was about to fuse it into a solid piece anyway. Even doing so, there are telltale signs:
 In this picture you can see little dimples where the crack was, both at the inside edge (where the crack met the red stripe in a 3-way "joint") and at the outside edge, where it looks like clear glass filled the gap instead of white.
Holding the piece itself you can see the crack is lighter in color, although the surface is smooth. It looks like the clear base fills in the gap instead of the white, and while there doesn't appear to be any weakness, it is visible.
The fourth blank had a similar issue, a small but not insignificant chunk popped off a white strip. The "heal" is noticeable, as before:

(Update, a few days later):
Another variation of this turned up when I made the plate, though you can see it in the last photo as well. Fusing is no replacement for good cutting and fitting!
 There was a slight error or shelf present and the red stripe was not in as solid contact with one white piece as it was the other. As a result, on close inspection, you can see how the clear again made up the difference.
Holding the piece itself you can see the crack is lighter in color, although the surface is smooth. It looks like the clear base fills in the gap instead of the white, and while there doesn't appear to be any weakness, it is visible.
The fourth blank had a similar issue, a small but not insignificant chunk popped off a white strip. The "heal" is noticeable, as before:

(Update, a few days later):
Another variation of this turned up when I made the plate, though you can see it in the last photo as well. Fusing is no replacement for good cutting and fitting!

Manufacturer's Lie
Very pleased with today's fusing:
 The first blank I fired, and immediately slumped into a bowl, picture here for sake of a complete record:
 I didn't think to measure the finished blank to see how much the size changed. With the second one I did measure it, and found out it actually shrank slightly!
My understanding from a Bullseye Technote (I think) is that warm glass wants to be 6mm thick, and it should contract or expand to try and reach that level. The glass base I'm using is 3mm, and the colored glasses are 3mm. I expected no change.
M. Sigulf suggested that the rolling process actually makes the sheets a little thinner than the official spec, and as a result it contracted a bit. Fortunately, with 6" disks and a 13" kiln shelf, I can actually get two blanks fused at once and save some firings. Unfortunately the plate mold we are using is 7"; It will be back to single firings for that, unless I want to make 6" plates instead.
First! Oh, wait...
Decided to use this blog as a handy way to track glass experiments and projects, instead of facebook and 10 other places. If you are reading, welcome!
Subscribe to:
Posts (Atom)